Basic HTML Version


6
103
www.TELE-satellite.com —
09-10/2012 —
TELE-satellite International —
全球发行量最大的数字电视杂志
1. Website for downloading
FileZilla, a top-notch FTP client
that is available as freeware.
2. The plugin is copied to
the AZBox ME with the help
of FileZilla. We have chosen
Quickconnect and entered the IP
address and username in the top
line. A password is not required.
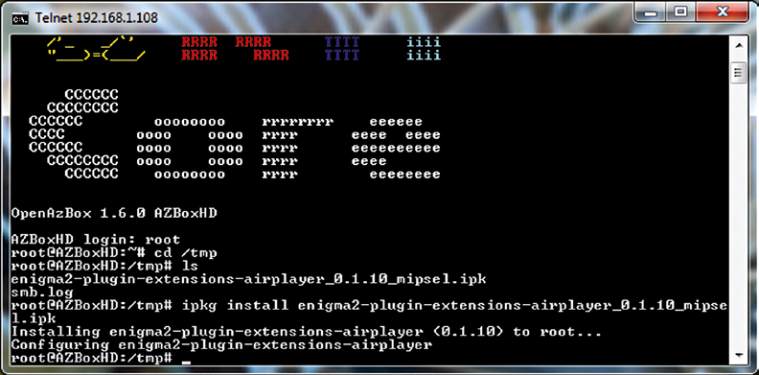
3. Then we start a Telnet session
in the DOS window.
4. Once again we need to enter
the username. And once again a
password is not required – just
press ENTER.
5. We now use the cd command to
go into the /tmp directory. With the
Is command we can call up all files
inside that directory.
6. The ipkg command finally
installs the plugin. The install
option is also entered.
it allows sending command
lines from a remote location
across a network. Windows
operating systems come with
a Telnet client right from the
start, which can be called up
in a DOS window, for exam-
ple: You only need to press
the Windows and R buttons
at the same time to start it,
and then enter ‘cmd’.
So let’s turn from theory
to practice now: In order to
install the plugin you first
have to copy it to the receiv-
er using FTP. Ideally, the plu-
gin should be placed into the
/tmp directory which is used
for temporary files (hence
the name /tmp) which are
not required permanently for
the receiver to work.
The content of the /tmp
directory is deleted every
time the receiver starts up,
something that is just right
for us since the installation
file of the plugin will not be
required any longer after the
plugin is fully installed and
thus will not occupy valu-
able memory capacity. Even
though the AZBox ME pro-
vides a generous amount of
memory there is no reason
to be wasteful.
In the FTP client of your
choice (FileZilla in our test)
you then need to enter the IP
address of the AZBox ME re-
ceiver. If you don’t know it or
are not 100% sure you can
always look it up in the setup
menu of the receiver. Sim-
ply go to Setup, then select
System, followed by Network
and finally Adapter Settings.
This will gives you the cor-
rect IP. If you see 0.0.0.0
this means you first need to
go about configuring your lo-
cal network before you are
able to proceed.
Apart from an IP address
FileZilla requires a username
with corresponding pass-
word before it will establish
an FTP connection. Connec-
tion data can be set up per-
manently or you may choose
to use the upper line to cre-
ate a ‘Quickconnect’ session.
We use this field to enter the
IP address of our AZBox ME,
‘root’ as the username and
we leave the password field
empty. This should work,
unless a password was spe-
cifically set by the user via
Telnet.
This set up should allow us
to connect to the AZBox ME
and the first thing we will see
is the base directory. From
here, a double click on ‘tmp’
will lead us to the /tmp di-
rectory, which is right where
we belong at this stage. The
link section of the FileZilla
window displays the directo-
ry structure of the PC which
means it is possible to drag
and drop files from any di-
rectory of the PC to the /tmp
directory of the receiver.
Next, we call up a DOS
window on the PC (press the
Windows and R buttons at the
same time, then enter CMD
and press ENTER). We then
key in ‘telnet 192.168.1.108’,
with 192.168.1.108 being the
IP of our AZBox ME. The IP of
your receiver may of course
be different and you always
have to use the actual IP ad-
dress of your AZBox for this
procedure to work.
What follows next is a re-
quest to enter the username
(root) and password (press
ENTER to leave that field
empty) in order to access
the home directory. Again,
we need to change from
there to the /tmp directory,
which can easily be done by
keying in ‘cd/tmp’. To the left
of the cursor the currently
selected directory is shown
and at this stage this should
read root@AZBoxHD:/tmp#.
Using the command ‘ls’
calls up a list of all files in the
current directory and one of
those files should be the in-
stallation file of the plugin.
You might ask yourself
what the *.ipk file exten-
sion stands for. IPK means
that files of this type are
managed by the so-called
Itsy Package Management
System which makes sure
that all files are automati-
cally copied into the correct
directory of the AZBox ME.
In case runtime libraries are
not available the installation
routine is interrupted and
the system will create a cor-
responding alert message.
In order to install the IPK
file on the AZBox the follow-
ing ipkg command has to be
entered:
Ipkg –install enigma2-
plugin-extensions-airplay-
er_0.1.10_mipsel.ipk
By the way: Use the TAB
key to complete file names
– in this case you only have
to key in ipkg –install e and
a touch of the TAB key will
insert the rest automatically.
Once the plugin has been
installed it is necessary to
re-start the receiver. In most
cases it will even suffice to re-
start the user interface only.
At last the time has come to
try out the new plugin. And
what an awesome plugin it is.
Simply take your iOS device
(no matter whether it’s an
iPhone, iPod or iPad), open
a photo, click on the Airplay
icon, select the receiver (Air-
Player E2) and as if by magic
the photo will appear on the
TV. The same also works for
videos, even though at this
stage the sound is unfortu-
nately missing.
Obviously, your iOS device
must use the same WiFi net-
work as your AZBox ME for
all this to work, but in most
environments this is the
case anyway.
Thanks to this plugin the
AZBox ME can easily become
the centre for a slideshow
Downloading and Installing the AirPlayer
Plugin and required Tools