Basic HTML-Version


LEXIUM
123
www.TELE-satellite.com —
12-01/2012 —
TELE-satellite International — The World‘s Largest Digital TV Trade Magazine
along with a looped-through
output connector. There
you’ll also find the 16 VDC
input jack as well as a USB
interface.
Before doing anything
else, the rechargeable bat-
teries need to be installed
into the 7100 Pro signal me-
ter. The battery compart-
ment is located on top of
the meter and is accessed
by opening the top cover.
All eight rechargeable bat-
teries supplied with the me-
ter need to be installed. The
inside of the battery com-
partment is clearly marked
to help prevent the batter-
ies from being installed in-
correctly. The manufacturer
recommends charging the
batteries for at least five
hours before using the sig-
nal meter for the first time.
The meter weighs in at about
1 Lb 7 oz (645g) with the
batteries installed. When
the power supply is plugged
in to the signal meter, not
only does the status LED il-
luminate red, but progress
of the charge is also shown
on the LCD display. There’s
a timer to indicate how long
the meter has been charg-
ing and there’s also an in-
dicator to show the voltage
level of the batteries. When
we plugged in the power
supply, the timer started at
00:00 and the voltage level
was at 10.5V. Although the
manufacturer recommend-
ed an initial charge time of
five hours, we let the sig-
nal meter charge overnight.
At the end of the charging
cycle, the LED turned off
and the display showed the
message “Charged Stop”.
This is a very interesting
feature that let’s you keep
an eye on the progress of a
charging cycle.
Now that the meter is fully
charged, we can start put-
ting it through its paces.
Turning the meter on is a
simple matter of holding
down the F4 function button
for about two seconds. The
very first screen to appear
asks you to decide whether
or not you want the back-
light for the LCD display
turned on. Simply push the
F1 button for “Day” (back-
light off) or the F2 button for
“Night” (backlight on). If you
don’t make a choice within
ten seconds, the meter au-
tomatically turns itself off.
There are four menus
built into the meter: Ad-
ditional Functions, Manual
Search, Auto Search and
Motor 1.2. The left and right
arrow buttons (F2 and F3)
can be used to move be-
tween the different menus.
The “OK” button (F1) is then
used to select the desired
menu that you want to work
with.
We decided to start with
the Additional Functions
menu. From this menu you
can choose to edit the pa-
rameters of the satellites
stored in the meter’s mem-
ory or modify the settings
of the meter. The FastAlign
7100 Pro comes preloaded
from the factory with only
27 satellites that include
many of the more popular
American satellites as well
as a few Asian satellites.
However, soon regionalized
lists will be available from
the manufacturer’s web-
site www.LEXIUM-DVB.com
covering the popular satel-
lites in Europe, Asia, Middle
East and Africa.
If the satellite you want
to align your antenna to
is not in the list, you sim-
ply need to edit one of the
existing entries using the
front panel function but-
tons to add the satellite
you need. This is done in
the Editor menu inside the
Additional Functions menu.
Once you are in the Editor
menu, you can among other
things change the satel-
lite name, edit transponder
Download this report in
German
www.TELE-satellite.com/
TELE-satellite-1201/
deu
/lexium.pdf
data, select the correct LNB
LOF frequency (OFF, Uni-
versal, 10750, 5150, 5750,
10600, 9750 and 11300),
set up any necessary DiS-
EqC protocols (1.0 and 1.1
can be set up here; there‘s
a separate menu section for
setting up DiSEqC 1.2), en-
ter in the orbital position of
the satellite as well as turn
the Auto Search feature on
or off.
The USB port on the back
of the meter lets you link
the meter with a laptop or a
PC. This link will allow you to
perform these editing func-
tions on your laptop or PC
with loader software avail-
able from the manufacturer
at www.LEXIUM-DVB.com
or www.wsidigital.com. The
software allows the user
to change and/or update
all parameters including
DiSEqC port settings, LO
frequencies, transponder
names, and parameters.
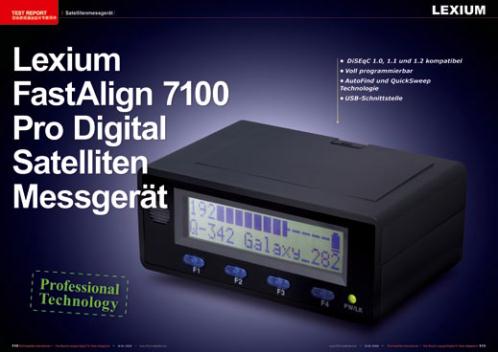
The AutoFind technol-
ogy that is built into the
FastAlign 7100 Pro satellite
meter is an automatic satel-
lite recognition technology
that recognizes the satellite
that your antenna is point-
ing to and then displays the
name of that satellite on the
meter’s LCD display from
the preprogrammed list
of satellites stored in the
meter’s memory. Directly
above the name of the sat-
ellite is also a signal quality
bar graph that can be used
to fine tune the antenna for
best possible signal.
The timing of this test
report couldn’t have been
any better. Hurricane Irene
passed through our test
center here on Long Island,
New York just a few days
ago. She brought with her
quite a bit of wind that re-
sulted in many of our dish
antennas being blown out
of alignment. This proved to
be the perfect opportunity
to put the meter through
its paces. The worst hit
antenna was our 3.0-me-
ter C-band mesh dish. The
strong winds created such a
great amount of torque that
the entire antenna assem-
bly spun around on top of
the mast. So much for the
mounting bolts that were
supposed to keep the an-
tenna in place. This seemed
like a good place to start.